# Hono\[炎\]
English
·
日本語
[](https://github.com/yusukebe/hono/actions)
[](https://github.com/yusukebe/hono/blob/master/LICENSE)
[](https://www.npmjs.com/package/hono)
[](https://www.npmjs.com/package/hono)
[](https://www.npmjs.com/package/hono)
[](https://github.com/yusukebe/hono/pulse)
[](https://github.com/yusukebe/hono/commits/master)
Hono[炎] - _日本語の炎に由来 🔥_ - はCloudflare WorkersやFastly Compute@Edge向けの小さくて、シンプルで、めちゃくちゃ速いWebフレームワークです。
```js
import { Hono } from 'hono'
const app = new Hono()
app.get('/', (c) => c.text('Hono!!'))
app.fire()
```
## 特徴
- **めちゃくちゃ速い** - ルーターはぐるぐるループを回しません。
- **依存ゼロ** - Service WorkerもしくはWebスタンダードのAPIしか使っていません。
- **ミドルウェア** - ビルトイン・ミドルウェアに加え自分でミドルウェアを作ることができます。
- **最適化** - Cloudflare Workersに最適化されています。
## ベンチマーク
他のCloudflare Workers向けのルーターと比べると**Honoが一番速い**です。
```plain
hono x 809,503 ops/sec ±6.94% (73 runs sampled)
itty-router x 157,310 ops/sec ±4.31% (87 runs sampled)
sunder x 328,350 ops/sec ±2.30% (95 runs sampled)
worktop x 209,758 ops/sec ±4.28% (83 runs sampled)
Fastest is hono
✨ Done in 60.66s.
```
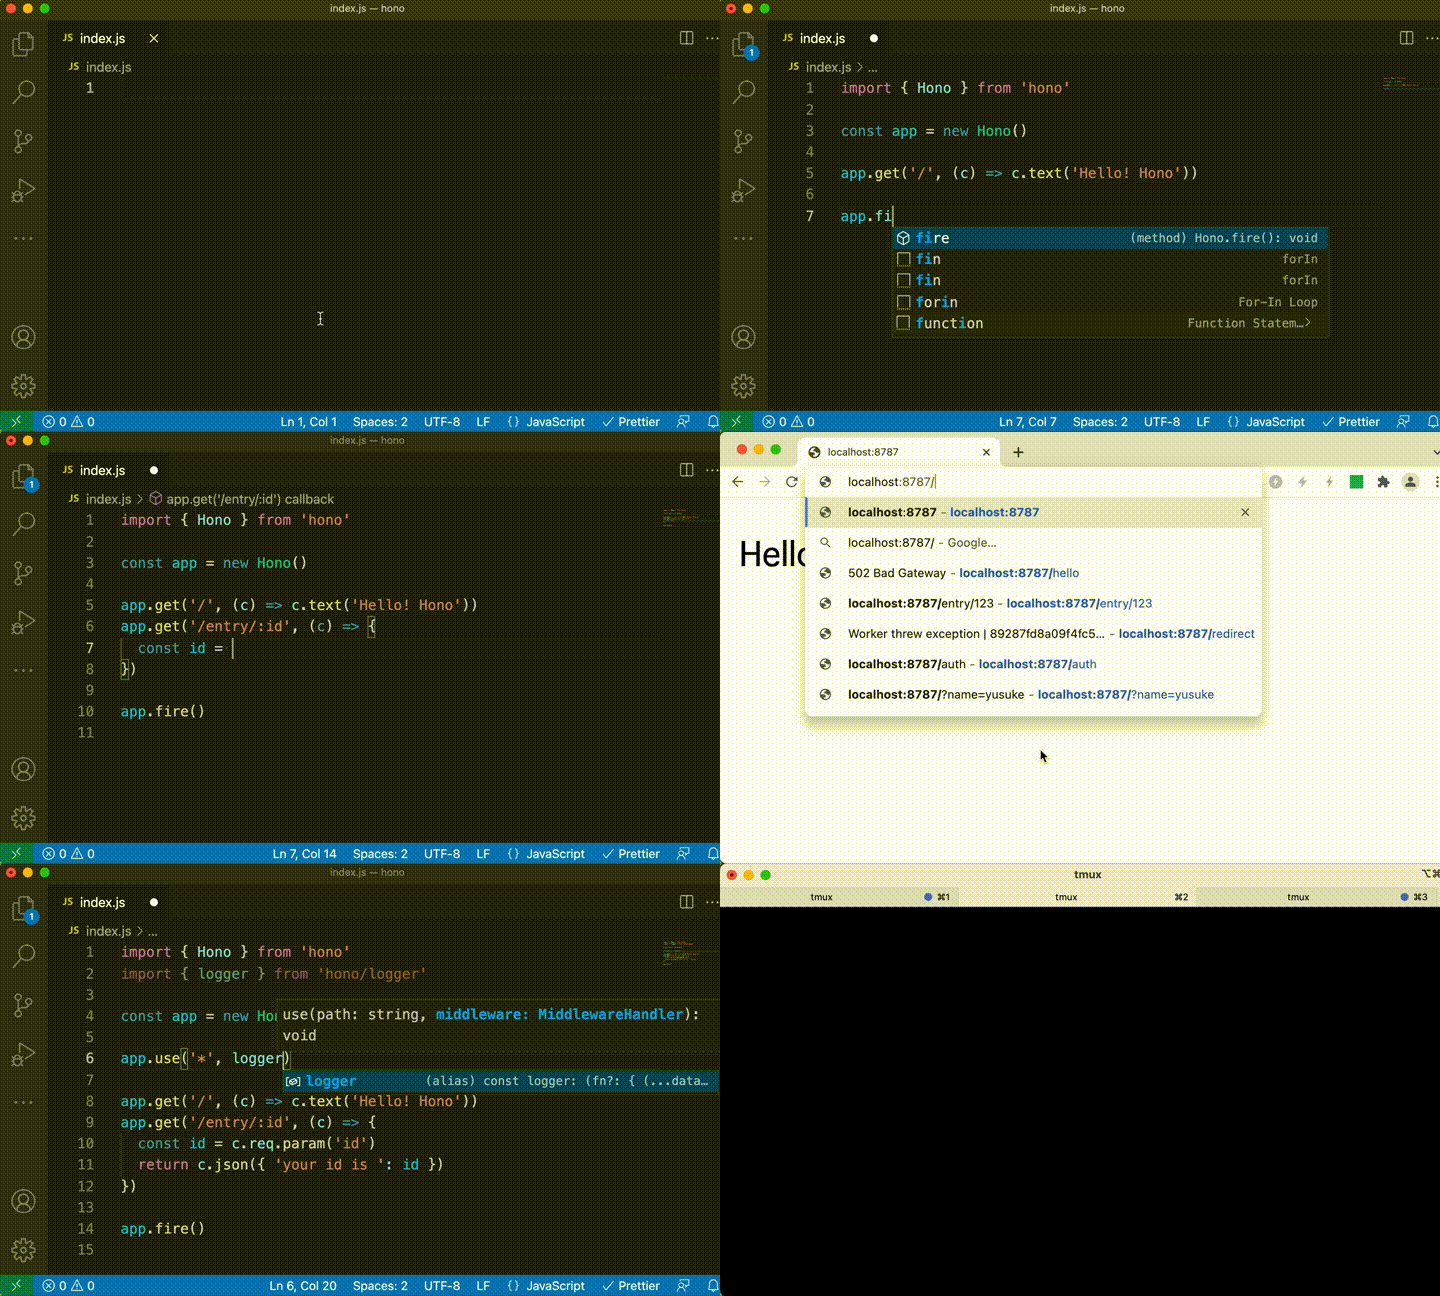
## 1分間で分かるHono
Honoを使って、Cloudflare Workersのアプリケーションを作っている様子です。

名前付きパラメーターにも型がつきます。

## インストール
NPMリポジトリからインストールできます。
```
$ yarn add hono
```
`yarn`、もしくは`npm`コマンドでインストール。
```
$ npm install hono
```
## メソッド
`Hono`のインスタンスには以下のメソッドがあります。
- app.**HTTP_METHOD**(path, handler)
- app.**all**(path, handler)
- app.**route**(path)
- app.**use**(path, middleware)
- app.**notFound**(handler)
- app.**onError**(err, handler)
- app.**fire**()
- app.**fetch**(request, env, event)
## ルーティング
### 基本
```js
// HTTPメソッド
app.get('/', (c) => c.text('GET /'))
app.post('/', (c) => c.text('POST /'))
// ワイルドカード
app.get('/wild/*/card', (c) => {
return c.text('GET /wild/*/card')
})
// どんなHTTPメソッドも受け付ける
app.all('/hello', (c) => c.text('Any Method /hello'))
```
### URLからパラメーターを受け取る
```js
app.get('/user/:name', (c) => {
const name = c.req.param('name')
...
})
```
### 正規表現
```js
app.get('/post/:date{[0-9]+}/:title{[a-z]+}', (c) => {
const date = c.req.param('date')
const title = c.req.param('title')
...
})
```
### ネストされたルート
```js
const book = app.route('/book')
book.get('/', (c) => c.text('List Books')) // GET /book と同じ
book.get('/:id', (c) => {
// GET /book/:id と同じ
const id = c.req.param('id')
return c.text('Get Book: ' + id)
})
book.post('/', (c) => c.text('Create Book')) // POST /book と同じ
```
### 末尾のスラッシュの扱い
`strict`がfalseの場合、`/hello`と`/hello/`は同じように扱われます。
```js
const app = new Hono({ strict: false }) // デフォルトはtrue
app.get('/hello', (c) => c.text('/hello or /hello/'))
```
### async/await
```js
app.get('/fetch-url', async (c) => {
const response = await fetch('https://example.com/')
return c.text(`Status is ${response.status}`)
})
```
## ミドルウェア
### ビルトイン・ミドルウェア
備え付けのミドルウェアが用意されています。
```js
import { Hono } from 'hono'
import { poweredBy } from 'hono/powered-by'
import { logger } from 'hono/logger'
import { basicAuth } from 'hono/basicAuth'
const app = new Hono()
app.use('*', poweredBy())
app.use('*', logger())
app.use(
'/auth/*',
basicAuth({
username: 'hono',
password: 'acoolproject',
})
)
```
利用可能なビルトイン・ミドルウェアについては[src/middleware](https://github.com/yusukebe/hono/tree/master/src/middleware)を参照してください。
### カスタム・ミドルウェア
自分でミドルウェアを書くことができます。
```js
// カスタムロガー
app.use('*', async (c, next) => {
console.log(`[${c.req.method}] ${c.req.url}`)
await next()
})
// カスタムヘッダーの追加
app.use('/message/*', async (c, next) => {
await next()
c.header('x-message', 'This is middleware!')
})
app.get('/message/hello', (c) => c.text('Hello Middleware!'))
```
## Not Found
「Not Found」レスポンスをカスタマイズした時は`app.notFound`を使います。
```js
app.notFound((c) => {
return c.text('Custom 404 Message', 404)
})
```
## エラーハンドリング
エラーハンドリングには`app.onError`を使います。
```js
app.onError((err, c) => {
console.error(`${err}`)
return c.text('Custom Error Message', 500)
})
```
## Context
レスポンス、リクエストを扱うには`Context`を使います。
### c.req
```js
// リクエストオブジェクトへアクセスする
app.get('/hello', (c) => {
const userAgent = c.req.headers.get('User-Agent')
...
})
// ヘッダーの値を取得する
app.get('/shortcut', (c) => {
const userAgent = c.req.header('User-Agent')
...
})
// クエリーパラメーター
app.get('/search', (c) => {
const query = c.req.query('q')
...
})
// URLからのパラメーターを受け取る
app.get('/entry/:id', (c) => {
const id = c.req.param('id')
...
})
```
### レスポンスへのショートカット
```js
app.get('/welcome', (c) => {
// ヘッダーの設定
c.header('X-Message', 'Hello!')
c.header('Content-Type', 'text/plain')
// HTTPステータスコードの設定
c.status(201)
// レスポンスを返す
return c.body('Thank you for comming')
})
```
上記で返すレスポンスは以下と同じです。
```js
new Response('Thank you for comming', {
status: 201,
statusText: 'Created',
headers: {
'X-Message': 'Hello',
'Content-Type': 'text/plain',
'Content-Length': '22',
},
})
```
### c.text()
`Content-Type:text/plain`ヘッダーをつけてテキストを返します。
```js
app.get('/say', (c) => {
return c.text('Hello!')
})
```
### c.json()
`Content-Type:application/json`ヘッダーをつけてJSONを返します。
```js
app.get('/api', (c) => {
return c.json({ message: 'Hello!' })
})
```
### c.html()
`Content-Type:text/html`ヘッダーをつけてHTMLを返します。
```js
app.get('/', (c) => {
return c.html('Hello! Hono!
')
})
```
### c.notFound()
`Not Found`レスポンスを返します。
```js
app.get('/notfound', (c) => {
return c.notFound()
})
```
### c.redirect()
リダイレクトします。デフォルトのステータスコードは`302`です。
```js
app.get('/redirect', (c) => c.redirect('/'))
app.get('/redirect-permanently', (c) => c.redirect('/', 301))
```
### c.res
```js
// レスポンスオブジェクトを取得
app.use('/', (c, next) => {
next()
c.res.headers.append('X-Debug', 'Debug message')
})
```
### c.event
```js
// FetchEventオブジェクトを取得
app.use('*', async (c, next) => {
c.event.waitUntil(
...
)
await next()
})
```
### c.env
```js
// Environmentオブジェクトへのアクセス。Cloudflare Workers向けです。
app.get('*', async c => {
const counter = c.env.COUNTER
...
})
```
## fire
`app.fire()`は以下を実行します。
```js
addEventListener('fetch', (event) => {
event.respondWith(this.handleEvent(event))
})
```
## fetch
`app.fetch`はCloudflare Module Workerシンタックス向けのメソッドです。
```js
export default {
fetch(request: Request, env: Env, event: FetchEvent) {
return app.fetch(request, env, event)
},
}
/*
もしくは、これでもOK。
export default app
*/
```
## HonoでCloudflare Workersのアプリを作る
[Wrangler](https://developers.cloudflare.com/workers/cli-wrangler/)もしくは[Miniflare](https://miniflare.dev)を使えば、ローカル環境での開発から、デプロイ・公開までが数行のコマンドで簡単にできます。
Honoを使って、Cloudflare Workersのアプリケーションを書いてみましょう。
---
### 注意
**Wrangler 1.x系** はミドルウェアのインポートに対応していません。2つの方法を推奨します。
1. [Wragler 2.0 Beta](https://github.com/cloudflare/wrangler2)を使う。
2. webpack 4.x系を使わない。例えば[esbuild](https://esbuild.github.io)を利用できます。[スターターテンプレート](https://github.com/yusukebe/hono-minimal)を参考にしてみてください。
---
### 1. `npm init`
まず、雛形となるプロジェクトを作成します。
```
$ mkdir hono-example
$ cd hono-example
$ npm init -y
```
### 2. `wrangler init`
Wrangler向けに初期化します。
```
$ npx wrangler@beta init
```
質問されるので`y`か`n`で答えます。最初、分からないうちは`n`で構いません。
```
Would you like to install wrangler into your package.json? (y/n) <--- n
Would you like to use TypeScript? (y/n) <--- n
Would you like to create a Worker at src/index.js? (y/n) <--- n
```
### 3. `npm install hono`
`hono`をNPMレジストリからインストールします。
```
$ npm i hono
```
### 4. コードを書く
たった4行書くだけです!
```js
// index.js
import { Hono } from 'hono'
const app = new Hono()
app.get('/', (c) => c.text('Hello! Hono!'))
app.fire()
```
### 5. 起動させる
ローカルで開発サーバーを立ち上げます。
その後、`http://127.0.0.1:8787/`にブラウザでアクセスしてみましょう。
```
$ npx wrangler@beta dev index.js
```
### 6. 公開
以下のコマンドでCloudflareにデプロイします。
これで終わりです!
```
$ npx wrangler@beta publish index.js
```
## スターターテンプレート
Cloudflare Workersのアプリケーションを書き始めるのに[スターターテンプレート](https://github.com/yusukebe/hono-minimal)を使うことができます。
TypeScript、esbuild、Miniflareを使った最小限のものとなっています。
このテンプレートを使った雛形を生成するには、以下のコマンドを打ちます。
```
$ wrangler generate my-app https://github.com/yusukebe/hono-minimal
```
## 関連プロジェクト
最初に作ったHonoの`TrieRouter`というルーターは[goblin](https://github.com/bmf-san/goblin)を参考にしました。`RegExpRouter`は[Router::Boom](https://github.com/tokuhirom/Router-Boom)にインスパイアされています。APIのデザインは[express](https://github.com/expressjs/express)と[koa](https://github.com/koajs/koa)を参考にしました。同じCloudflare Workersのルーターもしくはフレームワークには[itty-router](https://github.com/kwhitley/itty-router)、[Sunder](https://github.com/SunderJS/sunder)、[worktop](https://github.com/lukeed/worktop)があります。
- express
- koa
- itty-router
- Sunder
- goblin
- worktop
- Router::Boom
## コントリビュート
コントリビュート歓迎です。以下の方法で貢献できるでしょう。
- ドキュメントを書いたり、修正する。
- ミドルウェアのコードを書く。
- バグフィックス
- コードのリファクタリング
- などなど
一緒にHonoを作りましょう!
## コントリビューターの方々
[全てのコントリビューター](https://github.com/yusukebe/hono/graphs/contributors)へ。ありがとう!
## 作者
Yusuke Wada
## ライセンス
HonoはMITライセンスのもと開発・公開されています。詳しくは[LICENSE](LICENSE)をご覧ください。